Archive | Holidays RSS feed for this section

Cinnamon Roll Brunch

30 May

Hope you guys had a fabulous Memorial Day weekend! Over here in Boston, the weather was A-M-A-Z-I-N-G! The sun was shinning, the sky was clear–the perfect combination for swim-suits in the park and long summer runs {and by long I mean 2-miles, unless you are the fabulous Elise and are kickin’ butt in your half marathon!!!}

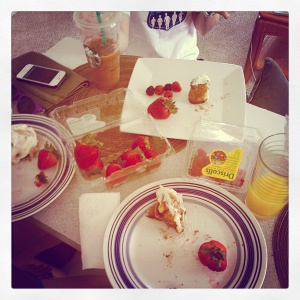
What was left of our brunch feast

These rolls are definitely my new breakfast go-to food, so friends, if/when you invite me over to brunch, except these to make an appearance. But seriously. Try them and you will see what I’m talking about.

Any long weekend calls for a brunch with friends to celebrate the fact that you’re not at work on Monday morning. After doing a little blog reading, I discovered a new site with incredible recipes, including this super easy, super yummy cinnamon roll recipe! I have been wanting to make these for forever and never found one I liked/was willing to try. But these…these give Pillsbury a serious run for their money. The Baker Chick is my new kitchen role-model! Recipe was found here on her blog. And huge bonus, these legitimately take all freaking day 90 minutes, including prep-time, waiting for the dough to rise, and bake time. Oh, and browned butter is my new favorite smell. Trust me.

90 minute cinnamon rolls

Ingredients

For the dough:

  • 3/4 cup milk
  • 1/4 cup butter
  • 3 1/4 cups all purpose flour
  • 1 (.25) package instant yeast
  • 1/4 cup sugar {regular white, granulated sugar}
  • 1/2 teaspoon salt
  • 1/4 cup water
  • 1 egg

For the filling:

  • 1 cup brown sugar {pack it in tight!}
  • 1 tablespoon ground cinnamon
  • 1/2 cup butter

For the frosting:

  • 2 tablespoons softened {not melted} butter
  • 4 oz cream cheese
  • 1 tsp vanilla extract
  • 2 cups powdered sugar {you can use more or less depending on taste, I used less}

Directions

  • Heat milk in a saucepan until it bubbles–remove from heat. Add butter and stir until melted. Set aside and let cool.
  • In a large mixing bowl, combine 2 1/4 cups flour, yeast, salt and sugar–whisk together. Add water, egg and milk mixture, and beat with an electric mixer.
  • Add the remaining flour slowly a mix well with a wooden spoon because dough will be too sticky for the beaters {you probably could use the dough hook on your KitchenAid, but I have yet to use mine, so I just did it manually. Plus you don’t have to mix for that long so it wasn’t too bad}. When dough has just pulled together {all the ingredients are just combined} knead on a lightly floured surface until smooth, about 5 minutes. You’ll know the dough is ready because it will spring back when you press it.
  • Cover the dough with a damp cloth and let rest for 10 minutes. Meanwhile, brown your butter! {the Baker Chick does it in the microwave, but I did it stove top which isn’t too hard. I found instructions from Simply Recipes}
  • To brown your butter, heat skillet over medium-high heat. Cut butter into slices and place in pan, stirring/whisking frequently {you need to keep the butter moving so it doesn’t burn}. Your butter will bubble and foam, and then brown specks will start to form. Once you see the brown color, remove skillet from heat, but keep stirring. The butter will still cook but will not burn. {Seriously, stick your nose in the pan and smell–it’s the best smell EVER!}
  • While the butter cools slightly, mix brown sugar and cinnamon together in a small bowl.
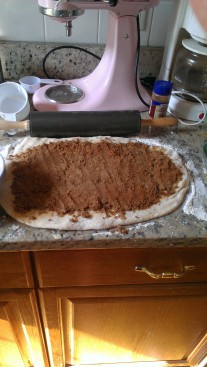
  • On a lightly floured surface, roll out your dough in approximately a 12×9 in rectangle {use your 9×13 baking dish as a guide}. Using a pastry brush–or a spoon–spread 90% of the brown butter over the dough. Sprinkle dough with cinnamon-sugar mixture, and press into the butter so everything stays put when you roll it all up.


My roll looks a little sad, but believe me, it still tasted delicious!

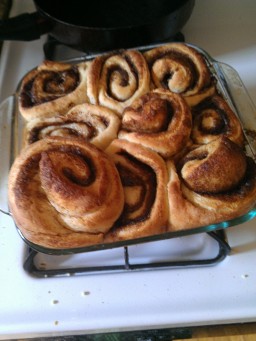
  • Roll up your dough and pinch the seam to seal. Cut into 12 {more or less if you can is fine} even pieces and place in a 9×13 baking dish {I used a smaller one, trust me, use the larger one!}. Drizzle the remaining brown butter over the rolls, and cover with a damp cloth and let rise somewhere warm until doubled, about30 minutes. I like to let mine rise in a sunny spot. Meanwhile, preheat your oven to 375 degrees
  • Bake rolls for 20 minutes, or until golden-brown. Let cool for about 10 minutes and serve warm, with cream cheese frosting {recipe below}

See what I mean about using a bigger pan? They were pretty squished in there

Home-made cream cheese frosting

{I have another cream cheese frosting recipe on the blog from last year’s Valentine’s Day. Both are similar, but Paula Deen’s recipe has a lot more sugar, cream cheese and butter….while neither are great for you, this one seems like it will clog your arteries a little less!}

  • Whip together the softened butter and cream cheese with an electric mixer until smooth and creamy
  • Add the vanilla and powdered sugar, 1/2 cup at a time, to taste. Beat until creamy and spreadable

If you have any of these rolls leftover from brunch {unlikely, but possible}, you can store them in a tupperware container in the fridge. Just zap them in the microwave and they’ll still have that just-out-of-the-oven taste. Mmmmm. Also, the frosting can be put in the freezer and saved for a rainy day. I hope you guys like this recipe because I am seriously obsessed. The feedback from my friends for this baking adventure was these were definitely in the top 5 things I’ve ever made. YAY.

Have a happy, happy week! And have fun baking, as always remember, it’s a cake walk!
Marvelous Lemon Meringue Pie

29 May

My dad was in town last week for graduation {YAY BU COM!} and he brought a ton of lemons for me from his backyard in California. Why, you ask? Just because So I could make him lemon meringue pie. My dad actually taught me how to make this delicious dessert years ago, but since then, the student has surpassed the master, aka I make a bangin’ pie and my dad’s attempts have been…well, not impressive, to say the least (Sorry Dad!). This is probably one of the harder recipes that I have made, since it requires a lot of attention, many steps and everything has to be just right in order for the entire pie to work. But the result is scrumptious. I love this pie–it’s the perfect summer recipe because of it’s light, fresh flavor, but I make this pie year-round as well {my family often has this in addition to or instead of pumpkin pie on Thanksgiving}. Lemon meringue rivals the other, absolutely favorite dessert, blackberry pie–always homemade in the summer from my dad’s backyard blackberry patch.

The happy graduate


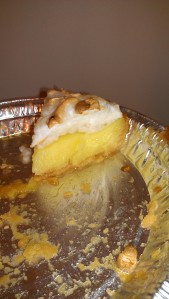
I apologize for the lack of pictures in this post…this pie went quickly, but I managed to get a picture of the last piece {desserts tend to last longer when I’m home alone and the only one eating them. M&Ms, on the other hand, are a different story}.

the last piece…

Don’t be discouraged if this doesn’t turn out exactly perfect, it takes time and practice!

Lemon Meringue Pie

Ingredients

  • Zest of 1 lemon
  • 1/2 cup fresh-squeezed lemon juice
  • 4 eggs, separated {one bowl for eggs yolks, one bowl for egg whites}
  • 1 cup sugar
  • 1/3 cup cornstarch
  • 1/8 teaspoon salt (just a pinch!)
  •  1 1/2 warm water
  • 1 tablespoon butter
  • 9-inch pie crust

For Meringue

  • 1/4 teaspoon salt
  • 1/2 cup sugar

Directions

Pie Filling

  • If you are using a pre-made pie crust, prepare according to package directions (each one is slightly different). If you are making from scratch, follow from recipe book. I’m lazy and never make my own pie crust–the store bought ones taste just as good to me!
  • Pre-heat oven to (number) degrees
  • In a small saucepan, combine sugar, cornstarch and salt. Stir in lemon zest, lemon juice and water. Cook over medium-high heat, stirring continuously {no lumps!} until sauce thickens and boils. This should take about 20-25 minutes. The sauce usually starts to boil along the edge of the pot–I like to be able to see a couple bubbles before I’m satisfied.
  • Remove pot from heat.
  • Pour a spoonful of the warm sauce into the egg yolks, beating quickly to avoid lumps {this process is called tempering–if you poured all the egg yolks into the warm sauce, the yolks would cook. This way, both the eggs and sauce become roughly the same temperature)
  • Pour the remaining egg mixture into the sauce. Return to low heat.
  • Stir egg mixture until thicken, but do not boil {one or two bubbles is ok, but once you see a boil starting, turn the heat off!}
  • Mix in butter. When butter is combined, pour filling into pie crust

Meringue

  • Pour egg whites into a large bowl, or bowl of your stand mixer
  • Add salt
  • Beat until soft peaks form {when you take the beaters out, the egg whites should stand up but then bend over immediately, you don’t want them standing straight up yet–those are stiff peaks}
  • Slowly add it sugar, beat until sugar is dissolved and stiff peaks form.

Assemble

  • Spread meringue over the pie filling. Using a spatula, distribute evenly and create decorative peaks.
  • Bake for 10 minutes, until meringue is golden.
  • Let cool overnight {if you can!} Otherwise you can cool the pie in the fridge for several hours. Refrigerate leftovers

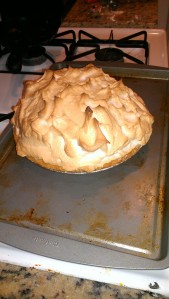
the finished pie

For whatever reason, this pie was h.e.a.v.y on the meringue. I think maybe it was from using the KitchenAid and its super powerful mixing powers. Either way, my dad ate a piece every day he was here, and isn’t that the validation us bakers constantly strive for?

Happy happy Memorial Day Weekend! Remember–it’s a cake walk!

Get Your Mardi Gras On

21 Feb

Happy Mardi Gras! While I’ve never been to New Orleans (tear) or really celebrated Mardi Gras, that’s no reason why I can’t enjoy some of the yummy-ful treats that are part of tradition!

I saw this recipe for king cake on Frock Candy’s blog. They are a delightful clothing company, with its HQ in Baton Rouge, LA. Check out their blog and online store! This cake was a HUGE success among the friends/roommates…some even said it was one of the best desserts to appear on the blog :) So thanks Frock Candy!

Have a safe and happy Mardi Gras, everyone!

King Cake

Ingredients:

2 packs of crescent rolls

8oz cream cheese

1 can pie filling

1/4 cup powdered sugar (for filling)

1 tsp vanilla

1/2 cup powdered sugar (for glaze)

2 tsp milk

Sprinkles for decoration (Mardi Gras colors are green, yellow and purple)

Directions

Pre-heat oven to 350 degrees. Lay out crescent rolls on at a time, with the points touching in the middle (you don’t need to press them together too much). Continue until you have a circle with all points facing inward.


Mix cream cheese, 1/4 cup powdered sugar, and vanilla together. Place filling over crescent rolls in a circle, and add pie filling on top.

Roll the points of the crescent rolls back over the mixture and filling.

Then, roll the flat end of the crescent rolls over the middle of the circle, and tuck under.

After the entire circle is sealed, bake for 20 minutes until a golden brown.

While the cake is baking, mix 1/2 cup powdered sugar with milk to form icing. If you want your icing to be thicker, add less milk.

Drizzle the icing on the cake when it is warm, so the icing spread out and drips over the cake. Add sprinkles (if you don’t have sprinkles, a few drops of food coloring in granulated sugar will do the trick!)


I think this cake is best served warm, but it’s good cold too. I don’t think I’ll be saving this cake only for Mardi Gras!

Happy baking! Remember, it’s a cake walk!

Happy V-Day <3

14 Feb

Happy Valentine’s Day lovelies! Unfortunately, I don’t have any pictures of any yummy desserts I baked today (gasp!). I admit, I slacked off this year. I had something wonderful planned out that required red velvet cake mix, but when I went to two stores, and both were sold out :( Even though I didn’t make this recipe, I still wanted to share it with you, in case any of you are need a last minute dessert, or want something to keep in your recipe box.

I hope you all have a wonderful day with your valentine, romantic or not. Think of it as a day to be thankful for anyone in your life that you love.

Red Velvet Rice Krispy Treats (find the original recipe here)

Ingredients

4 tablespoons butter

3 cups mini marshmallows

1/3 red velvet cake mix (powder only)

4 cups Rice Krispy Treats cereal

1 cup baking chips (or chocolate chips, whichever you prefer)

1 tub cream cheese frosting (or make your own!)

Directions

In a large pot over medium-low heat, melt butter. Add marshmallows and cake mix, stirring frequently until the marshmallows are melted.

Remove from heat and stir in cereal, then chocolate chips.

Press into a greased pan (a shallow baking pan works best) and allow to cool in the refrigerator for 20 minutes.

Cut treats (if you have a heart-shaped cookie cutter, awesome!) and decorate with cream cheese frosting.

Enjoy with your valentine.


Have a happy day everyone! As always–it’s a cake walk!

BEST CHRISTMAS EVER!

19 Jan

Hello readers! I know that it’s been a while since I posted last and I am going to try my best to post at least weekly! I am still baking a lot of delicious things that I want to share with you guys. I have a feeling that I will be baking more and more since I got one of these for Christmas/Hanukkah present….

My very happy Christmas face

(Please excuse the fact that I am in my PJs and haven’t brushed my hair)

My amazing and wonderful boyfriend surprised me on Christmas morning with my VERY OWN KitchenAid mixer. He even hid the box from me in the days leading up to Christmas so I wouldn’t get suspicious. Is he the best or what?? In a previous post, I said I wanted a blue mixer, but this baby pink one is beautiful, and even better, 10% of the proceeds from the purchase go to breast cancer research. Baking with this beauty, all for a good cause? It doesn’t get better than that.

Since I brought the mixer home (taking suggestions on what to name her, FYI) my friends have been sending me tons of recipes, so stay tuned for new posts!

Anyone out there have a KitchenAid and have any tips, or fave recipes? How about any attachments? I’m eyeing the ice cream making….

Happy baking–it’s a cake walk! :)

Strawberry Champagne Summer

19 Jun

Hello my readers! I am sorry for the long hiatus! Between finals, going home and coming back to Boston, it was a bit hectic. But I did manage to bake some delicious desserts that I am ready to share with you, and now that I have some more free time over the summer, I am on the hunt for new and always yummy recipes!

My best friend celebrated her birthday when I was back in California, and she commissioned me to bake her birthday cupcakes for the party. Her criteria was something light and fresh for summer, so after doing some searching online, I found this recipe, which has become a new favorite. Natasha loves strawberries, she loves champagne and the cupcakes were a hit! She’s not a fan of frosting, so we substituted the frosting in the recipe for whipped-cream and champagne-soaked strawberries (details posted below). I found this recipe on The Cupcake Recipes. This website has TONS of amazing recipes…I know I’ll be making more of their cupcakes.

Enjoy!

Sparkling Strawberry Champagne Cupcakes

  • 1 box strawberry cake mix
  • 1 1/4 cups champagne (As the website suggests, I used a sparkling rose wine)
  • 1/3 cup vegetable oil
  • 3 egg whites

Frosting

The original frosting recipe can be found on the website. Here is the frosting/toppings that I used:

  • 1 container of fresh whipping cream
  • 1 container of strawberries
  • Remainder of champagne from the cake batter

Directions:

  • Heat oven to 350°F (325°F for dark or nonstick pan). Place paper baking cup in each of 24 regular-size muffin cups. (Be sure to adhere to lowering the temperature if you have a dark pan! We didn’t lower the temp and the cupcakes were a little over-baked on the bottom–but still delicious!)
  • In large bowl, combine dry cake mix and champagne. Add oil, eggs.  Beat with electric mixer on medium speed for 2 minutes. Divide batter evenly among muffin cups.
  • Bake 17 to 22 minutes or until toothpick inserted in center comes out clean. Cool 10 minutes; remove from pan to cooling rack. Cool completely, about 30 minutes.

  • While the cupcakes are baking, cut strawberries in half, and combine strawberries and remainder of the champagne into a large bowl. Let them sit in the fridge for at least the time the cupcakes are baking, but the longer, the better.
  • Prepare whipping cream per-instructions on the carton with an electric mixer.
  • When the cupcakes are completely cooled, frost with whipped cream and top with a strawberry.
  • Drink the strawberry infused champagne (so yummy!)

Thank you guys so much for being supportive of my blog, and I hope you enjoy my summer baking recipes!

A Quick Update

29 Apr

Hello my lovely readers :) I hope that you all enjoyed the spectacular royal wedding this morning. I just wanted to give you guys a quick update: even though my  blog requirements have been fulfilled for my class, I am going to continue my baking blog and continue posting new recipes for you guys. However, I am currently in the last stretch of the semester, which includes papers and finals, and I will be traveling back home for two week (not to mention I still need to eat all the baked goods in my apartment!), I will be taking a short hiatus until I return. I hope that you guys will keep on reading my blog when I start posting again and leaving me  amazing comments! I really appreciate it.

Until next time!

Remember–it’s a cake walk!

Marshmallow Peeps Pie

23 Apr

I was cruising around Perez Hilton’s website today and I saw this recipe, just in time for Easter! Personally,  I am not a fan of Peeps (except for the homemade ones at Krause’s Candy in Saugerties, NY Mmmmmm) but I couldn’t pass up posting this fun and quirky recipe for Easter celebrations this Sunday. Peeps pie is a great dessert for anyone you know who just can’t get enough of those adorable, sugar covered chicks

Ingredients

10 marshmallow Peeps
1 egg
1/4  heavy cream (for pie filling)
2 Tablespoons flour
1 package of mini graham cracker crusts
1/4 cup sugar
1 1/4 cups heavy cream (to make topping)

Directions

  • Pre-heat oven to 375 degrees
  • Place Peeps in a large microwave-safe bowl. Microwave for 30 seconds, until peeps fluff up.
  • When peeps are done, immediately remove from microwave and beat in egg.
  • Add flour and 1/4 cup of heavy cream to bowl.
  • Spoon mixture in mini crusts, but don’t over fill! Leave a small amount of crusts visible at the top
  • Place crusts on a baking sheet, bake for 18-20 minutes, until pie centers are set (no longer jiggly, as I say).
  • Remove pies from oven a let cool.
  • With remaining 1 1/4 cups cream, beat cream and sugar together to make whipped cream.
  • Decorate cooled pies with whipped cream and extra peeps.

I really hope someone tries this recipe and sends in pictures… unfortunately since it’s still Passover, I can’t have graham crackers :(  and my friends are not a fan of Peeps so I can’t make them eat this dessert. But I am super curious as to how it looks/tastes. What are your favorite Easter recipes?

Happy Easter everyone! Happy baking, and remember–it’s a cake walk!

Passover Baking–Flourless Chocolate Cake

21 Apr

My refrigerator is still full of my chocolate covered cake balls. Since it’s Passover, however, I can’t eat any baked goods that contain flour. Every time I open the fridge to reach for some charoset to put on my matzo, those cake balls stare back at me. But sulk no more, fellow Passover-ians! Today I am here to share with you flourless chocolate cake, which is just like is sounds: There is no flour! Just eggs, chocolate, butter and sugar, aka things you can eat during this week. This cake is VERY rich due to the large amount of eggs (6 of them!) and all the butter and chocolate, but just chalk it up to the fact that we’re not eating any carbs this week. This recipe is a great one to keep in your cookbook year round for a special occasion, or if you have a friend who can’t eat gluten, for example. A fair warning: make this cake when you have a lot of time, because it takes 90 minutes to bake. Recipe from the lovely folks at the Food Network Kitchens

Hang in there my Jew friends! There is light at the end of the tunnel!

Ingredients

12 ounces bittersweet or semisweet chocolate (chopped)

1 1/2 sticks unsalted butter

1/4 teaspoon salt

6 large eggs

1 1/2 cups granulated sugar

Powdered sugar and/or coco powder for dusting (if desired)

Directions

Pre-heat oven to 325. Grease (and flour once Passover is over) a 9 by 2 inch springform pan (cheesecake pan)

Put the chocolate, butter and salt in a large microwave safe bowl. Melt in the microwave on 75 percent power for 2 minutes. Stir and microwave again until completely melted, about 2 minutes more.  (If you prefer, you can use the doubler boiler method:  put the chocolate and butter in a heatproof bowl. Bring a saucepan filled with an inch or so of water to a very slow simmer; set the bowl on the pan without touching the water. Stir occasionally until melted.)

Beat the eggs and sugar with a standing or handheld mixer until light and thickened, about 8 to 10 minutes.

Fold the melted chocolate into the whipped eggs until evenly combined.

Bakers Note: Folding an ingredient in is different than simply mixing. Watch this video to learn how to fold your chocolate into eggs…


Pour the batter into the prepared pan and bake until a toothpick inserted into the center comes out wet but not gooey, about 1 hour and 25 minutes. Remove cake from the oven and cool on a rack.

When ready to serve remove ring from spring form mold. Dust cake with confectioners’ sugar or cocoa powder. Serve with whipped cream or ice cream if desired.

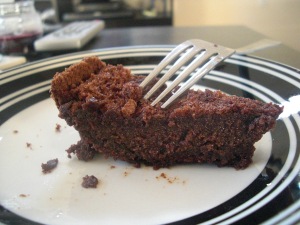
I have to admit, my cake didn’t look the best when it came out of the oven (it had this weird crust-like thing on the top), but once I cut the top off, the gooey and rich chocolate cake emerged. I am in love with this cake, and although it is quite unhealthy (lots of gym visits in my future!) one little sliver of cake is more than enough to satisfy me. I hope you guys enjoy this recipe and continue to have a wonderful Passover.

Happy Baking! Remember, it’s a cake walk! Have fun with your dessert-making experience!

Passover Baking: Macaroons

19 Apr

Today marks the first day of Passover. If you’re observing this holiday, you know that this means there are TONS of food you can’t eat, including lots of baked goods. No cake, cookies, brownies, pies, etc. Even though Passover impedes what you can bake–and eat–on Passover, there is still the holiday dessert staple that everyone, not necessarialy those observing the holiday, love: macaroons!

Macaroons come in a variety of flavors: regular, chocolate, espresso… but the classic is plain coconut, and is my favorite. The cookies are super easy to make and absolutely delicious. There is no way that you’ll be able to eat these only once a year! I found this recipe on Orthodox Union

Ingredients

2 cups packaged shredded coconut
1/2 cup sugar
3 egg whites
pinch of salt

Directions

Pre-heat oven to 325 degrees.
In a bowl, mix coconut, sugar and salt together.
Add egg whites and mix together until a “dough” is formed.

Separating Egg Whites


Work the dough into small balls using your hands, and place on a lightly greased cookie sheet
Baked 20 minutes, or until macaroons are lightly golden.

Enjoy after a delicious sedar meal (perhaps with some Manischewitz?) Keep checking back for Passover-friendly posts this week! And check out my friend’s blog Novice Noms for more Passover recipes!

Chag Same’ach my fellow Jews!

Remember–It’s a cake walk!